Showing posts with label Photoshop. Show all posts

Wednesday, 31 December 2014

task photoshop.

hye everyone..
it's been a while since i've update my blog. So, today, i wanna share with u guys my photoshop project for this semester. We have to make 3 poster/cover book and 3 manipulating image..So, let's take a look...


i'll explain how i make the picture later on...
hope you guys like it..
thanks for view my blog..
till we meet again..

Tuesday, 25 November 2014

reflection week 9

today, we're learnt about basic photo,image selecting and editing, and introduction of Adobe Photoshop.At first, we were introduced with the some editing software. there are a lot such as:

-Photoscape. not recommended for professional editing  but best for fun editing

-GIMP for Window(contain lot of manipulated image editing such as correcting color, brightness-contrast, sharpen/blur,remote red-eye,ect)

-Paint.NET (strong with image editing basic such as resize, good range on selection and paint tool and some amaze effect too!)

-LazPaint for Window &LINUX

-Serif PhotoPlus( remove imperfectyions in a flash, add stunning artistics effects, amazing color control, restore classic photo and many more)

-Photo Pos Pro

-Pixia
-VCW Vicman's Photo Editor
-PhotoFilter
-Ultimate painter
-Picasa


IMAGE SELECTION AND EDITING
image can be 2dimension or 3 dimensions.usually, it was taken by using optical devices such as camera, lenses, telescope,microscope and many more.

RESOLUTION AND PIXEL
the quality of a picture are depends on its resolution and pixel. the higher the pixel on the picture, the better the picture is.

reflection week 11

Hi everyone…! How was your day? ;) Hmm no matter how challenging your day, face it with love orait.
Have you practiced the Photoshop skill that we have learnt last week…? (Actually, I’m the one who taught you last week, hope you still remember me...(^_^))
We have learnt about combining image and special effects. Let’s refresh on what we have learnt before.  
1.       COMBINING IMAGE.
-To combine images, you need to have at least, 2 pictures.  First, create a blank canvas with your preferable size (file>new).for this canvas, I’ll color it to green so that you can classify the window.

-After that, open new file and choose any picture that you was want to use. (File>open)


(Choose picture> open)


-Okay, this time, we are going to use picture that we have choose. Follow this step. (magic wand tool>Click the area that you don’t want


(Select> inverse> click ok) .after that drag the photo to the canvas that we make before and click Ctrl at the same time.
The picture will look like below.


So, now, you can start make a combination using your creativity. I make a new one. hee
from two picture:
&
&

this is the product. 


SPECIAL EFFECT
Now, let’s ass up some effect on out images. But first, I’ll introduce to you, where we can have an effect.first on filter and on layer button.
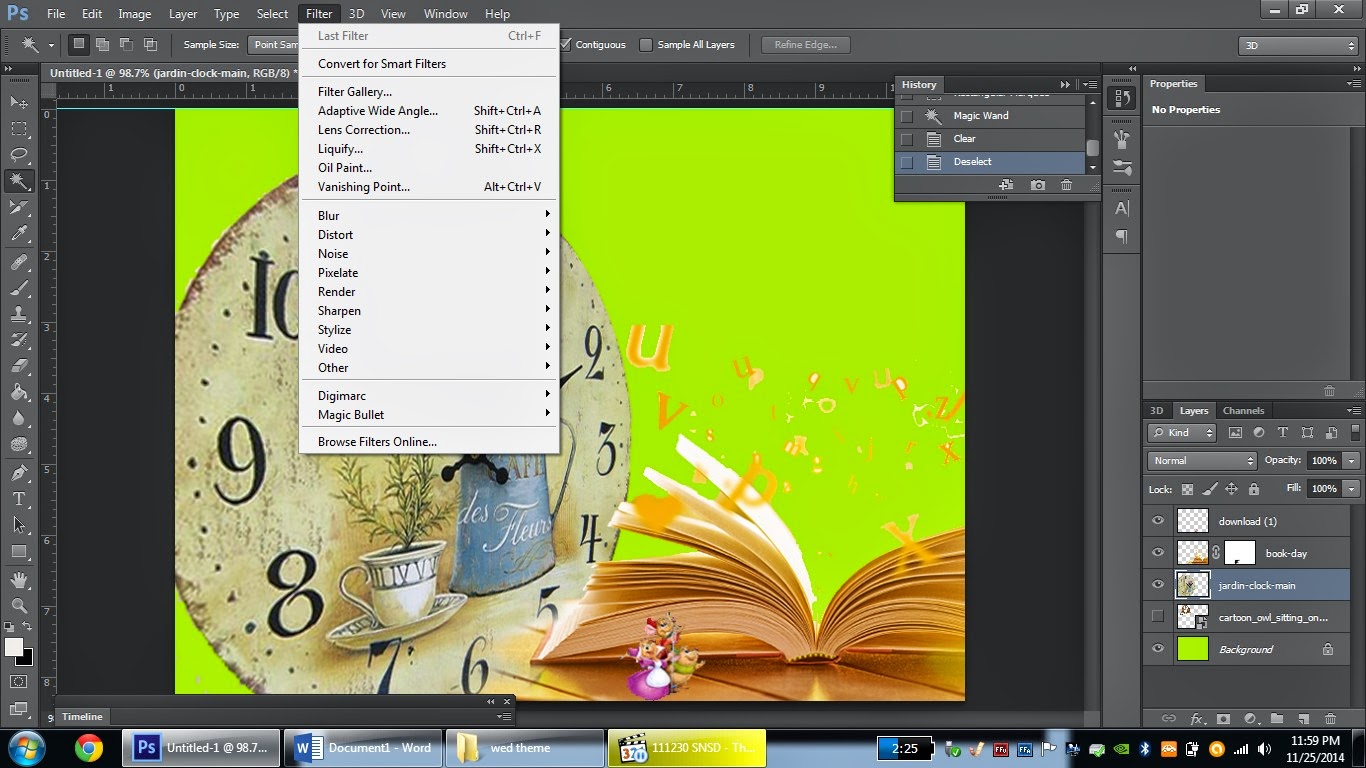

Now, lets try make some effect on the canvas.
I’m going to make a text and add up some effect. First, click icon “T” and make a word. And then highlight the word. Follow this: (layer>layer style> choose any effect you prefer) I’m going to choose stroke as my effect.


You may try other effect you want. ;)
Let’s try other effect. For example blur effect.
For example, you want to make the clock look blur at it’s edge.
First, click on the clock layer. then, choose an effect.(filter>blur>radial blur>ok)

Adjust the blur width.then click ok.

This will be the product.

Thursday, 13 November 2014

reflection week10

yeah! this is i'm waiting for....;) it's time for Photoshop!!!


IMAGE TRANSFORMATION 
must be boring if we only can see an image with a static pose, right? But, Photoshop enable us to make a transformation with different position such as resize, skew and many more.

okay, first of all, lets learn how to import a picture from your folder to the photoshop.
STEP 1:drag the image to the adobe photoshop


STEP 2: tick on the upper bar


STEP 3: CLICK ON THE PICTURE LAYER AND click the rectangular marquee tool on the right tool bar. After that, put the curser on the picture.

STEP4: Right click on the picture and choose free transform.right click again.


the picture below will show how your picture will look like:

(i)resize picture
(ii)rotate angle: you have to put your curser on the edge of the box. After an arrow like below appear rotate the box at any degree you wish.

(iii)skew/distort/perspective: The picture can be move backward or frontward from one side.


(iv)crop: just choose picture that you want.

(v)flip horizontal or flip vertical
HUE AND SATURATION
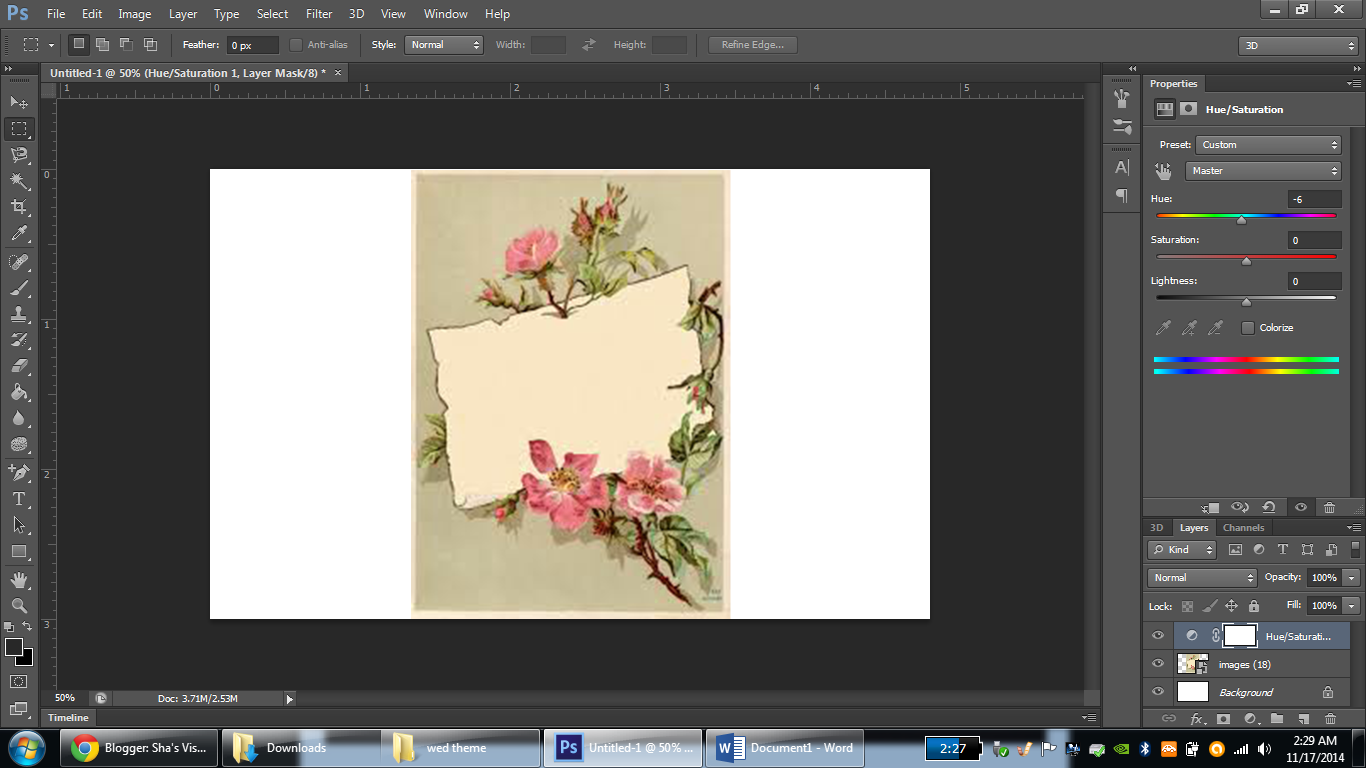
Hue and saturation are another effect for photoshop.its help us  adjust the hue, saturation, and lightness of a specific range of colors in an image or simultaneously adjust all the colors in an image. 

STEP 1: click on the layer and the picture. make sure you are using the rectangular marquee tool.
STEP2: Layer>new adjustment layer>hue and saturation.
STEP3: there will be a pop up window as below.just click ok.
STEP 4:
if you look at the right side of the adobe photoshope, there are colour scale. just adjust you preference colour scale and it will automatically adjust your picture with the selected colour.